Everything You Need to Know About Clipper Guards: How Do They Work and How To Maintain Them Properly
Clipper guards work by attaching to the blade of a hair clipper, acting as a barrier that controls the distance between the clipper blades and the scalp. This distance determines the length of the hair that gets cut, ensuring that hair is trimmed evenly across the head.
In this article we’re going to discuss everything: how clipper guards work, how to properly clean them and maintain them, the difference between lengths, and the best lengths for different fade haircuts.
Clipper guards are used to ensure the exact size of hair you want to cut yourself or cut your client. When you buy a hair clipper, you will get a set of guards you can attach to your clipper.

Most guards have a snap-on mechanism. This usually involves a small plastic or metal tab on the guard that fits into a corresponding slot or groove on the clipper.
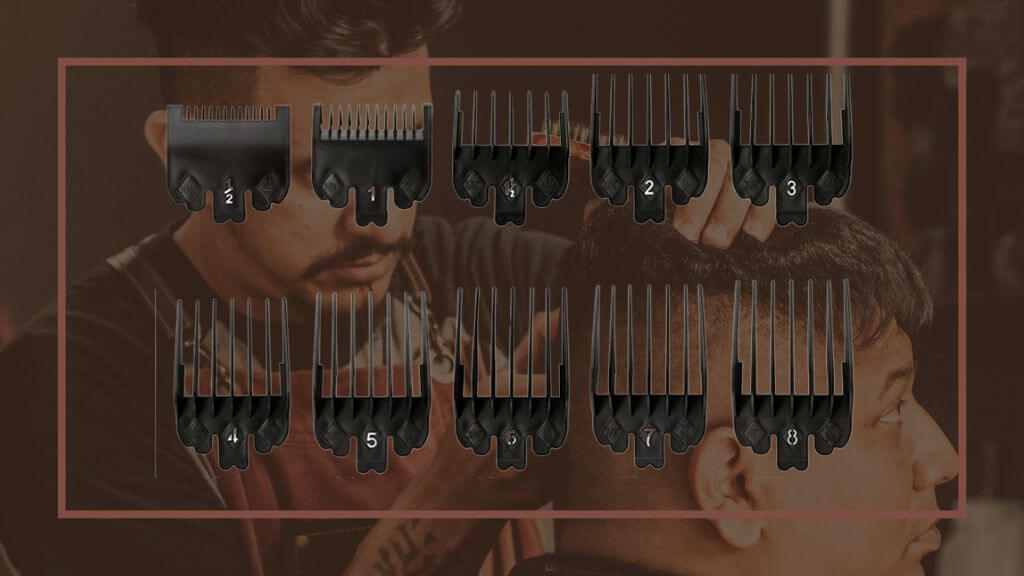
Each guard has a different length, which decides how long your hair will be after cutting. The thicker the guard, the longer your hair will be because it keeps the cutting blades further away from your scalp. When you run the clippers with a guard through your hair, the guard makes sure that all the hair is cut to the same length, giving you a nice, even haircut. It’s a bit like using a ruler to draw a straight line, ensuring that everything turns out neat and tidy.
Most skilled barbers don’t use clipper guards at all. Because of their years of experience, they can cut hair freehand to the length the customer wants. But if you’re a DIY guy or a new barber, using clipper guards is a must for safety. Clipper guards help you avoid mistakes by ensuring you don’t cut the hair too short, and they make it easier to achieve an even cut all around.
If you want to cut without guards, you will cut yourself into the shortest length ( 0/1 inch or 0.4 mm).
| Guard Number | Length (inches) | Length (mm) | Style |
|---|---|---|---|
| #0 | 1/16 | 0.5 | Leaves hair very close to the scalp, almost bald. |
| #1 | 1/8 | 3 | Leaves hair very short, ideal for buzz cuts or the shortest part of a fade. |
| #2 | 1/4 | 6 | A bit longer, still quite short. Good for short styles and the initial stages of fading. |
| #3 | 3/8 | 10 | Starts to leave a bit more hair, creating a short but more styled look. |
| #4 | 1/2 | 13 | Leaves a medium length of hair, great for more noticeable styles while still being fairly short. |
| #5 | 5/8 | 16 | Begins to enter into longer styles, allowing for more styling flexibility. |
| #6 | 3/4 | 19 | Offers a longer style, suitable for those wanting a longer buzz cut or crew cut look. |
| #7 | 7/8 | 22 | Provides a much longer look, often used for blending and tapering into longer hair styles. |
| #8 | 1 | 25 | The longest standard guard for most clippers, leaving a full inch of hair. |
| Fade Type | Starting Guard Number | Ending Guard Number | Description |
|---|---|---|---|
| Skin/Bald Fade | #0 (No Guard) | #2 or #3 | Begins with the skin or no guard at the bottom, gradually blending into a #2 or #3 towards the top for a stark contrast. |
| Low Fade | #1 | #3 or #4 | Starts with a #1 guard close to the ears and neckline, blending upwards into a #3 or #4 for a subtle transition. |
| Mid Fade | #1 or #2 | #4 or #5 | Begins around the middle of the sides of the head with a #1 or #2, blending into a #4 or #5 towards the upper region for a medium gradient. |
| High Fade | #1 or #2 | #5 or #6 | Starts high on the sides of the head with a #1 or #2, blending into longer lengths like a #5 or #6 towards the top for a dramatic transition. |
| Taper Fade | #2 | #4 or #5 | A more subtle fade, starting with a #2 at the lowest point and blending into a #4 or #5, typically involves more gradual blending and less contrast than other fades. |
Fade Articles You May Like:
You need to clean clipper guards every 3-4 times you use them to prevent them from getting all gunky and germ-y.
But if you’re cutting hair for others, you gotta clean them after every single use (you want returning customers, right?).
Related Articles: How To Clean Clipper Blades | How To Get Short Hair To Lay Flat
Option 1) The Barbicide Bath
Ever heard of Barbicide? It’s this blue liquid that barbers love to use for cleaning clipper guards.

Mix a little with water (1/4 cup Barbicide to 4 cups cold water) and let your guard take a 10-minute dive. It’s like a spa for your guard, the most efficient descent that will kill all the germs.
Option 2) Alcohol

If you’re out of Barbicide, rubbing alcohol is your next best option. Dunk the guard in a bowl of 70% alcohol for a minute. Or, you can use alcohol wipes, just make sure you get into all those nooks and crannies.
Option 3) Disinfectant Spray

In a rush? Grab a disinfectant spray and spray it 5 times on a guard, and wait for a few minutes.
Final Step: Dry It Out
After the cleaning, let your guard air-dry. This part’s important because it lets the disinfectant do its magic a bit longer, making sure all the germs are gone for good. If it’s dripping wet, pat it down with a clean towel.
Frequently Asked Questions
Plastic guards are lighter, more affordable, and come in many sizes, making them versatile and user-friendly. However, they might not last as long as metal guards. Metal guards, on the other hand, are more durable and can provide a more precise cut, but they tend to be heavier and more expensive.
Yes, clipper guards can be used on all types of hair, including straight, curly, thick, and thin hair. However, the technique may vary slightly depending on hair texture
You should replace your clipper guards if you notice they’ve become cracked, warped, or if they no longer attach securely to your clipper.
Conclusion
We’ve gone through everything in this article. Now, you know how clipper guards work, how to keep them clean, the different sizes they come in, and which sizes are best for different haircut styles like fades. Whether you’re aiming for a little trim or a bold new look, the right clipper guard can make all the difference. Keep practicing, and soon you’ll be able to do great haircuts by yourself at home.


